Project 5: Pyturis
Version 1.0. Last Updated: 2024-11-01.
We highly recommend reading through this spec in its entirety before you begin.
Project 5 will be submitted on PrairieLearn not Gradescope
Starter File and Submission Link
Content
I. Submission Guidelines
II. Intoruction
III. Part 0: Set Up
IV. Part 1: Board
V. Part 2: Pytromino
VI. Rubrics, Grading and Submission
VII. Appendix: Pyturis Game Rules
Submission Guidelines
To run the PrairieLearn autograder, you’ll need to submit models.py and board.py to the assignment titled Pyturis on PrairieLearn. You can either submit these filed individually or submit the entire project folder to the PL assignment, as irrelevant files will be filtered and not processed automatically.
Introduction
Brief

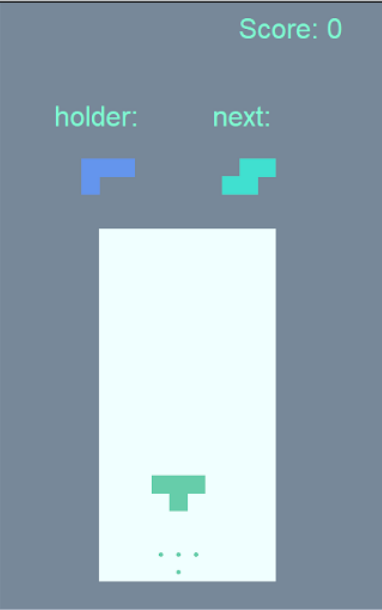
In this project, you’ll code the game Tetris in Python, with the Turtle library rendering the graphical user interface (GUI). Python + Turtle + Tetris = Pyturis! This game involves fitting blocks called “pytrominoes’’ together to fill and clear horizontal lines. When you’ve correctly implemented all the required functions, you’ll be able to play Pyturis on a screen that looks like the one to the right.
Preliminaries
You’ll need to have watched the Python lectures to complete this project. We also highly recommend completing Lab 13: Intro to Python before starting this project to get acquainted with Python and a text editor. Lab 14: Lists + Mutability and Lab 15: Data Structures in Python may help your understanding of how to use lists in Python, and Lab 16: OOP in Python offers a helpful tutorial with object-oriented programming (OOP) in Python, which is the basis of this project.
**We require you to complete this project with a partner. **
Goal
The goal of this project is to provide an opportunity for practicing working with object-oriented programming (OOP) in Python by building a practical program with a structure that mimics real-world projects. In this project, you’ll:
- practice working with row-major order (a common model for board structures, similar to the new 4x4 board with values block you used in Project 3)
- learn how to implement and work on either side of an abstraction barrier
- become familiar with using and extending an existing codebase rather than starting from scratch
TODO
All of the files you’ll need to implement are marked in the files with TODO: your solution here, which you can search for with CTRL+F when you open the starter code in your preferred text editor. You can play a few games of Tetris here, or read this additional section of the spec to become familiar with the game rules. If you’re writing more than 10 lines of code for any function, we recommend you consider other ways to achieve what you’re trying to do, or take a break and head to OH for assistance!
Part 0: Set Up
There are two things you’ll need to set up before you can begin working on the project: the version of Python you’re using and the starter code.
Python Version
To make sure your Python has all the expected functionality, you’ll need to be using Python 3.11. Check the version of Python that your computer has running by pasting the following line of code into your terminal. For Windows:
py --version
For Mac:
python3 --version
An example of the result from executing the code above should look like: (For Windows)
PS C:\Users\Oski> py --version
Python 3.11.x
(For Mac)
oski@Oski-MacBook-Air ~ % python3 --version
Python 3.11.x
If your version number is smaller than 3.11 (starts with 3.9 or something smaller), check out this nice How to update python page or go to OH or lab for help upgrading your Python version.
The Starter Code
To mimic the majority of real-world coding projects, for this project, you’ll be working with an existing codebase, where some functions and classes have already been defined for you. To begin, download the starter ZIP file here!
There are several files in the ZIP file, but you’ll only be editing models.py and board.py. If you’re curious, you can open and read the other files, but that isn’t necessary to complete the project. Do not edit any other files. If you think you have by accident, go to OH for help! The starter code also contains a local grader that you can use to run some provided sanity-check tests on your code (instructions are in the relevant sections). These local tests are a good barometer for how your implementation is doing, but there are additional randomized tests in the PrairieLearn autograder we expect you to pass to get 100%. Keep in mind that you’ll still need to pass the tests on the PrairieLearn autograder for credit.
Note: Do make sure that you’re not modifying function signature (how many/what types of arguments a function takes in, the name of a function, how many/what types of arguments a function outputs) as this could cause trouble when running the PL autograder. Nice work! Now you’re ready to start coding.
Part 1: Board
Brief
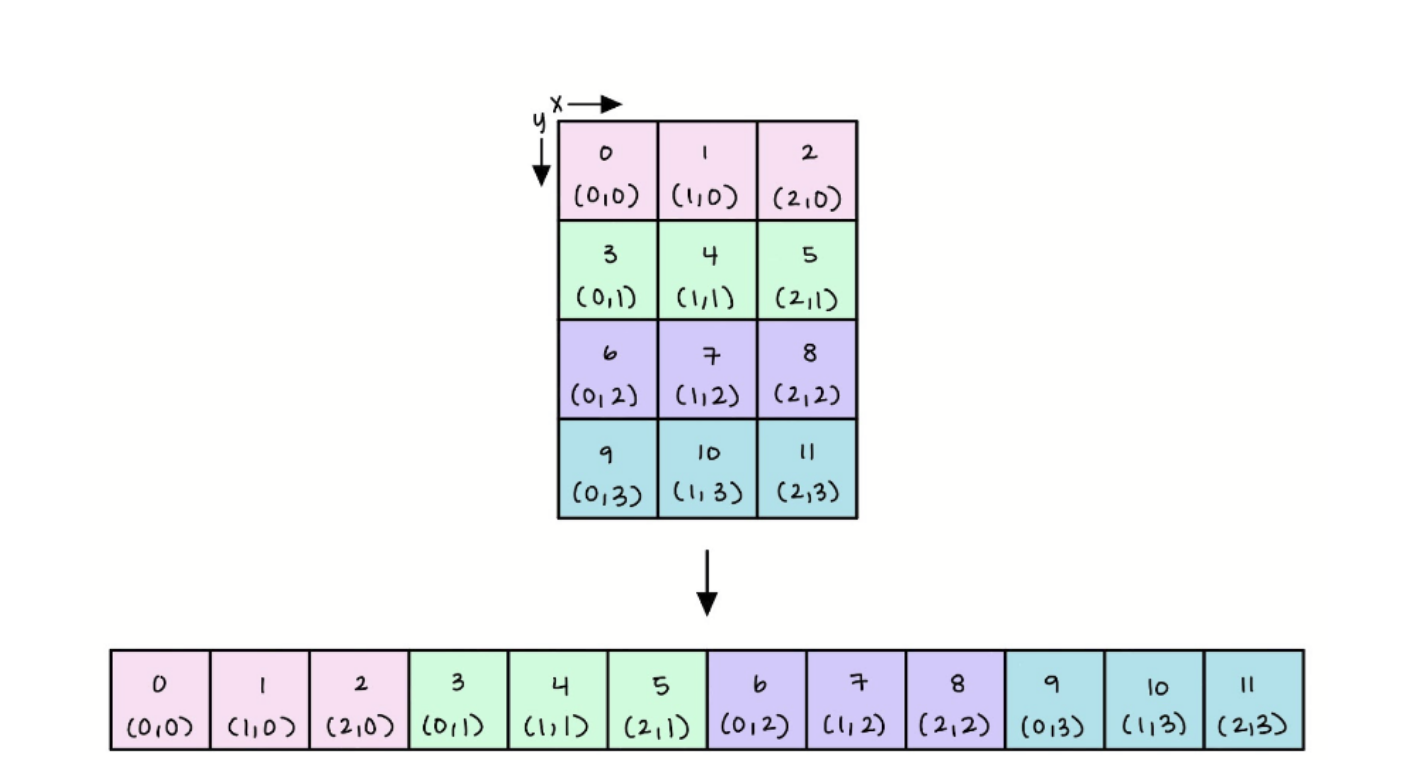
In Pyturis, the board is stored as a 1D list in row-major order. Row-major order stores values in the same row of a matrix consecutively and concatenates rows into a single list starting from the top.

The relationship between the coordinates of an item in the board — notated as (x, y) — and the index of the corresponding item in the row-major order list is represented by the following equation, and illustrated in the above image.
index = (y * num_cols) + x
Attributes
The Board class is located in the board.py file. As with the Holder class, there is already a constructor method provided, which contains a few useful attributes.
- [Int] self.num_rows represents the number of rows the board object has
- [Int] self.num_cols represents the number of columns the board object has
- [List] self.grid contains the values on the 2D board in row-major order
TODOs
You’ll need to fill out three methods in board.py:
- Q1: get_board_item(board, x, y): Return the item at (x, y) on the board.
- Q2: set_board_item(board, x, y, item): Return a new Board object where the input item is placed at (x, y) on the board. Hint: modify the new board created by copy, instead of directly modifying the original board!
- Q3: valid_coordinate(board, coordinate): Take in a coordinate formatted as a tuple of two ints, (x, y), and return whether it represents an existing position on the board as a boolean. x is valid if it is non-negative and less than the number of board columns y is valid if it is non-negative and less than the number of board rows coordinate is valid if x AND y are both valid.
- Q4: get_row(board, y): returns a list containing all items in row y on the board.
- Q5: check_row_full(board, y): Check if a row y on the board is full, such that all of its grids contain a non-zero value. If so, return True, else just return False. (In practice of the GUI, this works, because we gave an empty board a default value of 0, and then each types of pytromino a unique integer, so if some part of a pytromino is present at the first column of the row, then the row will look like [1, 0, 0, 0 … 0]. Rendered by the GUI, this is a colored block at the first column, and then empty in all other columns! If the row is full, it should then contain no 0 in it.)
Hints
- Keep in mind the equation above for calculating the index!
Local Tests
To check how your implementation is doing, you can run the local tests in the project directory with the following command. The code below tests all your work in board.py. To test each individual question, replace the Board in the command below with Q1, Q2, or Q3. If there is no output in the terminal, that means your tests are PASSING! For Windows:
py grader.py Board
For Mac:
python3 grader.py Board
Part 2: The Pytromino
Brief
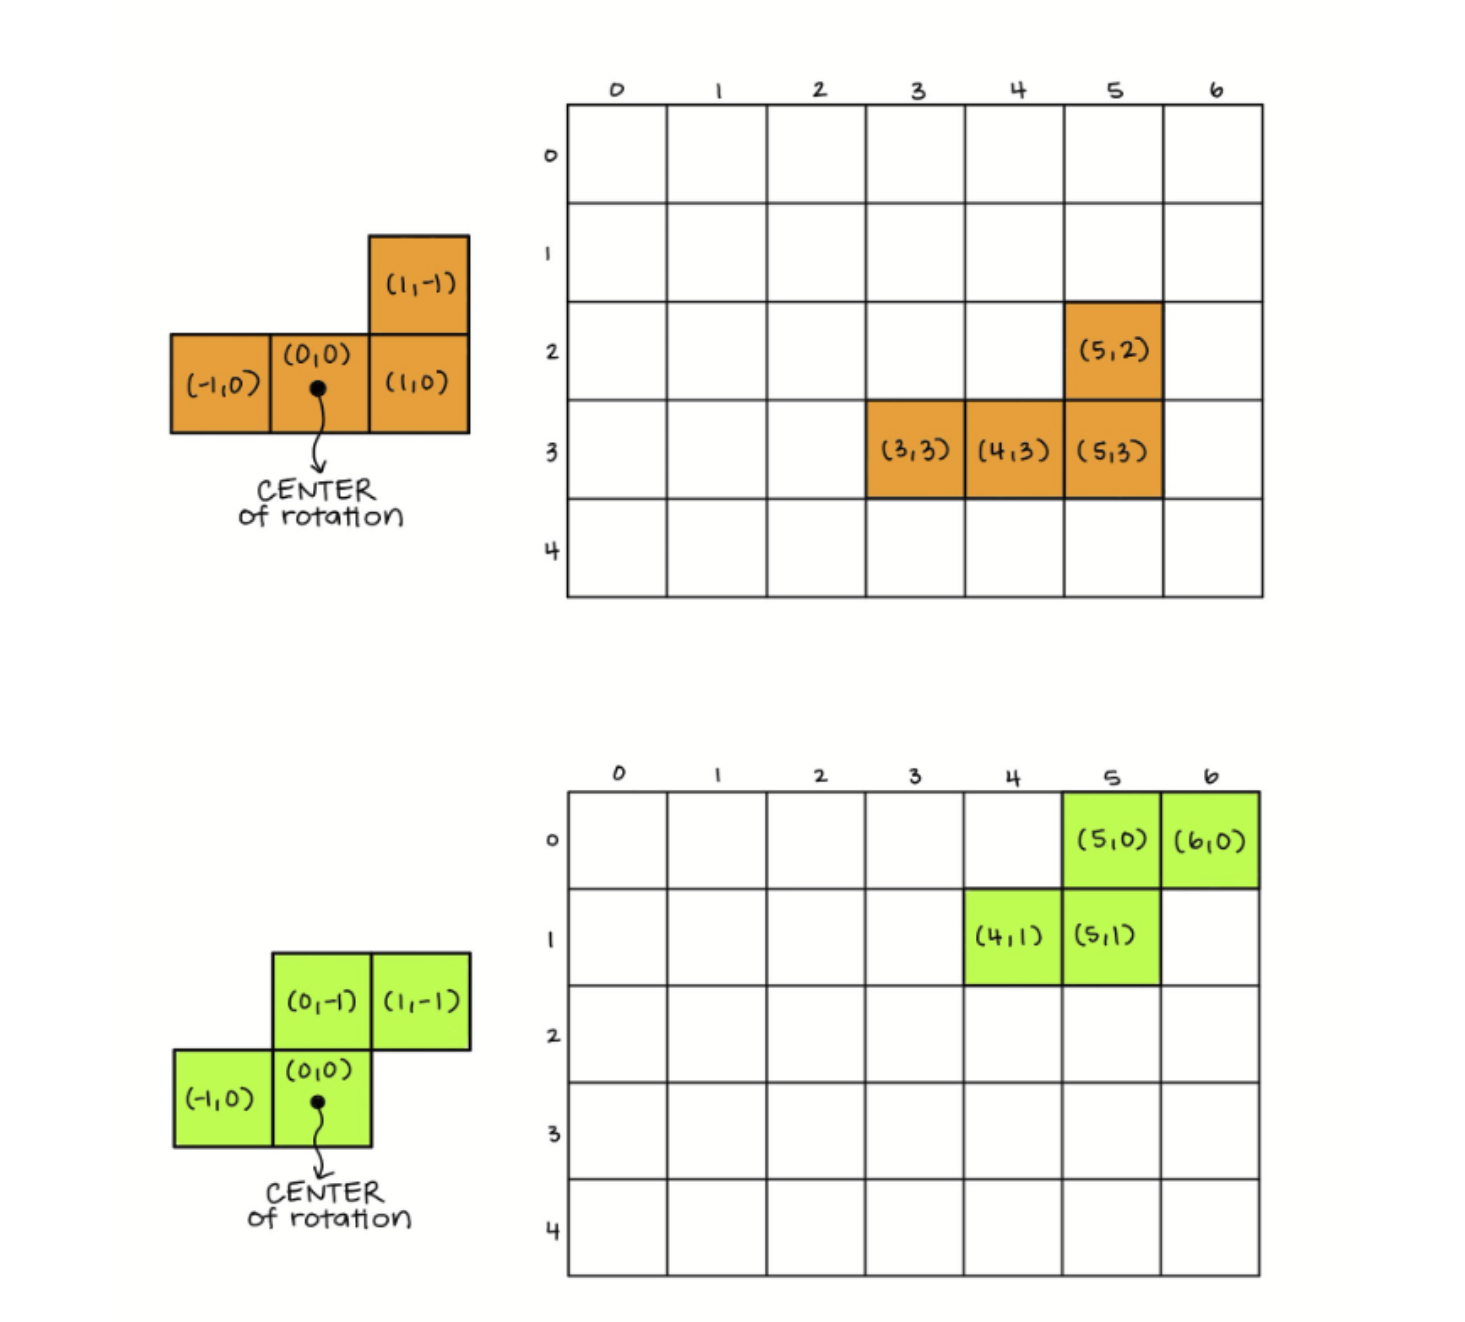
In Pyturis, pytrominoes are the name for the pieces that fall from the top of the board. Each pytromino is represented as a single shape made of four blocks. In addition to absolute coordinates that represent where the pytromino is on the board, each block in the pytromino has a relative coordinate, to indicate its position within the pytromino. The relative coordinates are calculated according to where the block is relative to the center of rotation for that pytromino.

Attributes
The Pytromino class is located in the models.py file. As with the Board class, there is already a constructor method provided, which contains a few useful attributes:
- [Tuple] self.center_rot represents the coordinates of the center of rotation block of a pytromino and defaults to (0, 0)
- [List] self.blocks_pos lists the set of coordinates (x, y) of the blocks in a pytromino relative to the center
TODOs
You’ll need to fill out four methods in models.py. We recommended (but do not require) that you use list comprehensions in your solution (when possible).
- Q6: rotate_block_90_cw(pytromino, pos): Given pytromino, a Pytromino object, and pos, a tuple of x, y coordinates representing the center of rotation, return the updated coordinates as a tuple when pytromino is rotated 90 degrees clockwise.
- Q7: filter_blocks_pos(pytromino, fn): Given pytromino, a Pytromino object, and the predicate function fn, which takes in a tuple coordinate and returns a boolean, filter the list of block positions of the pytromino on fn, and return the result as a new list of coordinates.
- Q8: shift_down_fn(pos, steps): Given a position pos as a tuple, return a new position that’s shifted down by steps. Hint: return a new position instead of directly modifying the original position!
- Q9: shift_left_fn(pos, steps): Given a position pos as a tuple, return a new position that’s shifted left by steps.
Validate & Apply
You’ll also need to fill out validated_apply_non_rot. However, you’ll need to have completed ALL other methods first. A validated apply means applying some transformation function (in our case, fn) to some input only if the output of that transformation function passes some validator check. If the output doesn’t pass the check, the input is left untransformed.
- Q10: validated_apply_non_rot(self, fn, validator): returns a new Pytromino object, whose coordinates will be updated correspondingly if the transformation fn is successful on all items in self.blocks_pos. If the operation is not successful, the coordinates of the returned object remain unchanged. This function is called when the transformation is not rotational.
In English, we have a Pytromino (consisting of four squares on the screen) and a fn() that wants to move it somewhere. The validator is going to check whether, as a result of that move, all the squares of the Pytromino are still on the screen (i.e., pass the validator). If all are, then great, return a Pytromino that is the result of the fn() move (remember BOTH the center of the Pytromino and all its squares need to be moved). Otherwise, don’t make the move and return a Pytromino without the fn() move applied.
arguments:
- [Pytromino object] pytromino: the Pytronimo object to operate on
- [Function] fn : takes in a coordinate and returns a transformed coordinate
- [Function] validator : validates an input coordinate; returns True if valid, False otherwise For this function, you should use validator to check each coordinate resulting from calling fn on every item in self.blocks_pos.
Local Tests
To check how your implementation is doing, You can run the local tests in the project directory with the following command. The code below tests all your work in models.py. To test each individual question, replace the Pytromino in the command below with Q6 through Q10. If there is no output in the terminal, that means your tests are PASSING!
Please make sure you are in the correct folder when you do your test. That is you are in FA22-Pyturis-Starter (if name unchanged) before running the doctests.
For Windows:
py grader.py Pytromino
For Mac:
python3 grader.py Pytromino
Running the GUI
Once you’ve finished all parts, you’re done! Nice work! You can now play the game of Pyturis you’ve coded, by running the following command inside the project directory: For Windows:
py __main__.py
For Mac:
python3 __main__.py
Rubrics, Grading and Submission
This rubric gives an overview of the points that passing tests in the PrairieLearn autograder is worth, relative to each function you have to fill out. This project is autograded, not manually graded, so what you see on PL when the autograder stops running is what your score is.
| Rubrics | |
|---|---|
| Part 1: The Board (15) | |
| get_board_item(board, x, y) | 4 |
| set_board_item(board, x, y, item) | 5 |
| valid_coordinate(board, coordinate) | 5 |
| get_row(board, y)) | 5 |
| check_row_full(board, y) | 5 |
| Part 2: The Pytromino (15) | |
| rotate_block_90_cw(pytromino, pos) | 5 |
| filter_blocks_pos(pytromino, fn) | 5 |
| shift_down_fn(pos, steps) | 5 |
| shift_left_fn(pos, steps) | 5 |
| validated_apply_non_rot(self, fn, validator) | 5 |
| Feeback Form (1) | |
Submitting to PrairieLearn
Before you submit, it’s a good idea to run the local sanity-check test cases again. You can do the whole batch at once using: for Windows:
py grader.py
for Mac:
python3 grader.py
Do keep in mind that the local tests aren’t representative of all the test cases that will be checked on PrairieLearn. The PrairieLearn autograder is available on the assignment on PrairieLearn, and will be announced over Ed, and you can submit to it an unlimited number of times to see how your project is doing.
To run the PrairieLearn autograder, you’ll need to submit models.py and board.py to the assignment on PrairieLearn. You can either submit these files individually or submit the entire project folder to the PL assignment, as irrelevant files will be filtered and not processed automatically.
Both you and your partner must submit the project individually into PrairieLearn.
The code between you and your partner can be the same. Once you’ve submitted, both of you will indicate each other as partners in the Project 5 Feedback Form A reminder that the project feedback form is worth 1 point of your project grade.
Appendix: Pyturis Game Rules
Below are the rules for Pyturis:
The game starts with a main menu. Press (s) to start the game.
You can change different difficulty levels by pressing (d) from the main menu, then press (1), (2), (3), (4), corresponding to Easy, Medium, Hard, and Expert, to select a specific level, and press (f) to confirm and return to the main menu. Defaulted to medium.
The game features acceleration, which, if set to “ON”, will make pytromino descend faster and faster in a game. You can toggle acceleration on/off by pressing (a) in the main menu. Defaulted to OFF.
You can press (t) from the main menu to view tutorials, which is basically a concise version of the rules here. To quit the game, press (q) from the main menu.
The game starts with an empty board. Different pieces (called “pytrominoes”) will descend one by one from the top.
As a pytromino descends, the player will be able to rotate and move it using the arrow keys. -To rotate a piece 90 degrees clockwise, press the (up) arrow key. -To move a piece left and right, press the (left) and (right) arrow keys respectively. -To move a piece down faster, press the (down) arrow key. -To “hard drop” a piece, press the (space) key.
On the right-hand side of the screen, the player will be able to see a preview of the upcoming pytrominoes. To put off using the current pytromino for the one coming up next, a player can put it “on hold” by pressing the (c) key. To exchange the current pytromino with the one that’s held, press (c) again. A player can only “hold” once per pytromino.
A pytromino will stop moving when it either hits the bottom of the board or comes to rest on top of another pytromino. If the placement of the pytromino results in the formation of a continuous horizontal line, this line will disappear. A player’s score increases based on the number of lines they clear, and number of lines they move the pytromino down.
The game ends when a pytromino hits the top of the board and no more lines can be cleared; you can not “win” a game in Pyturis. When a game ends, press (b) to return to the main menu.
At the beginning of the game, the holder is empty. The first time (c) is pressed, the pytromino will be stored in the holder, and the next pytromino will be dropped from the top. Importantly, each pytromino can only be swapped once in its lifetime; in other words, for each pytromino, only the first time (c) is pressed, does anything happen. The holder is meant to “hold” ONE item at a time.
When the holder is not empty, and a new pytromino is in the center grid, you can press c and the pytromino in the holder will be swapped with the pytromino currently in the center grid. Different from some of the Tetris implementations, Pyturis will not start dropping the swapped pytromino from the top of the center grid, instead, it will start dropping from where the current pytromino is (to make the game a little harder). As a result, if the swap is not possible because the swapping pytromino cannot fit where the current pytromino is, the swap will not happen.
When you are done, submit your file to PrairieLearn. You only need to upload the following files:
- board.py
- models.py