Project 3: 2048
Version 3.1. Last Updated: 2024-10-10.
We highly recommend reading through this spec in its entirety before you begin.
We also recommend you complete all labs up to and including Lab 8: Boards
To begin, load this starter project
Any important updates or clarifications will be made here:
Due Date Extended to Tuesday, 10/22
Project 3 Party: Thursday, 10/10 from 5 - 7PM in Soda 326
Project 3 Party: Monday, 10/7 from 5 - 7PM in Moffit 145
Guide to help with Testing Blocks
Content
I. Introduction
II. Helper Blocks
III. Suggestions
IV. Part 1: Populating the Board
V. Part 2: Rotating the Board
VI. Part 3: Merging
VII. Part 4: Ending the Game
VIII. Part 5: Tests
IX. Feedback Form
X. Grading
Submission Guidelines
Please submit on Gradescope using these submission instructions, and make sure to add your partner!
Introduction
In this project, you’ll be working off some skeleton code to build 2048! If you’re unfamiliar, 2048 is a sliding puzzle game where the goal is to combine same-valued tiles to reach the value 2048. You can play the game at this link for free to get used to how it works. You won’t be building the game from scratch, just filling out five blocks. All of those blocks will be reporters, and should not update the board display — that’s handled for you in the skeleton code. So make sure not to mutate the original board. Once you’ve completed those five block definitions, you won’t need to change anything else about the code; it should work!
In a nutshell, the game works like this:
- The starting board contains two tiles with values of 2 or 4.
- When the player hits an arrow key, all tiles on the board “merge” in that direction.
- After each merge, a random tile of value 2 or 4 is added to the screen.
- The game ends when there are no merges left. You “win” if a tile reads “2048” or more!
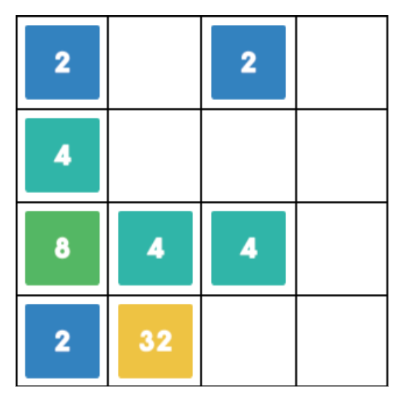
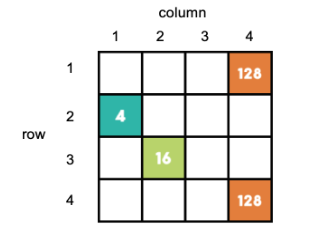
The board representation in this version of 2048 is abstracted away (we call that an “abstract data type”), but you can picture it as a table that looks like the picture on the right, containing only 0 and powers of 2 greater than or equal to 2 (e.g., 2, 4, 8, 16, etc). Do not assume that boards are always 4x4 – all the code we give you as well as the code you write should be able to work with any size square board!
Note: Make sure to run your game in Turbo Mode for best response time results. To turn on Turbo Mode, check the “Turbo Mode” box in the gear icon menu. The green starting flag will change to a lightning bolt (as shown).
This project must be completed with a partner. If you’re having trouble finding one, head to the Partner-Finding thread on Ed! Do remember that while you may discuss general ideas with students you aren’t partners with, sharing code would be academically dishonest. If you’re having trouble, please contact the course staff for assistance —Ed, Office hours, labs, and the project party are all here to help you feel good about the work you’re doing! If you can’t make the times, tell us, and we’ll figure out how you can still get support. But we won’t know when or how to help unless you let us know!
Note: You can import blocks from libraries
Helper Blocks
You will not need to know how we represent a board in this game — we have provided the following nine helper blocks for you to use to interface with our board implementation. The Power of Abstraction! With this in mind, please make sure not to modify the input board in any of the blocks you write! In addition, please use these blocks, rather than coming up with your own. Also keep in mind that you generally want to abstract as much as possible, meaning you should not use global variables within blocks. We created all custom blocks (including the five you will fill out) so that any information you’ll need will be passed into the block as input.
| Block | Input | Output | Description |
|---|---|---|---|
| new board size | side length (number) - desired length of one side of the board | an empty side length x side length square board | Use this block rather than the ‘new 4x4 board with values ___…’ block from the testing lab. That block should be used only for testing, per the name of the lab |
| size of board | board - a 2048 game board at some point in the game | the length of one side of the input board | – |
| item of | row (number), column (number), board (a 2048 game board) | the value (number) at row, column on the board | – |
| set item of | row (number), column (number), board (a 2048 game board), value (number) - a value to be inserted into board at row, column | none, this is a command block | Use this block to set a particular square on the board to a particular value |
| copy of | board - a 2048 game board at some point in the game | a separate board with all the same values as the input board | Use this block to build boards that need to have/start with the same values/game state as another board. Updating the copy will not update the input board |
| empty positions of | board - a 2048 game board at some point in the game | a list of lists where each sublist contains the row and column of an empty position | – |
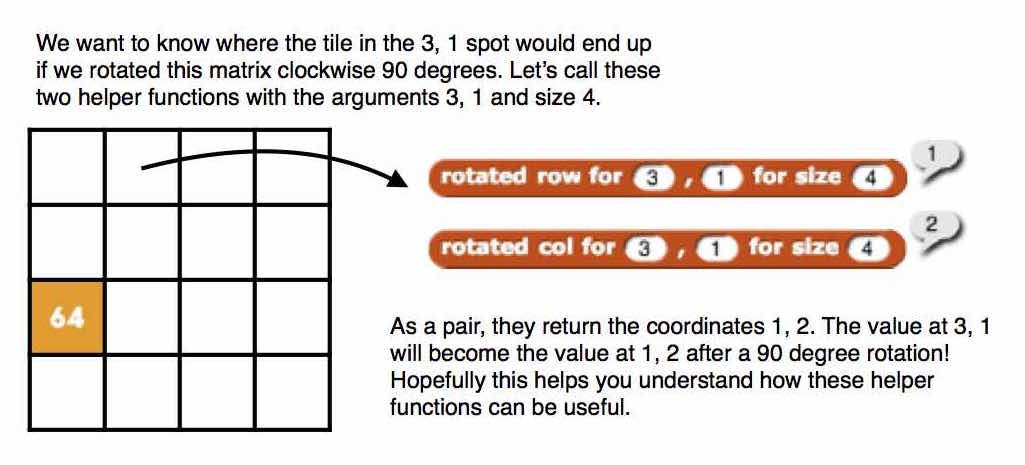
| rotated row for, for size | row (number), column (number), size (number) - the side length of the board you’d like to rotate within | the row number of the resulting location of this item | This block does not actually rotate any part of the board. It only returns the row that the input coordinates (row, column) would end up in if the board was rotated 90 degrees clockwise. Here is a visual example |
| rotated col for, for size | row (number), column (number), size (number) - the side length of the board you’d like to rotate within | the column number of the resulting location of this item | This block does not actually rotate any part of the board. It only returns the column that the input coordinates (row, column) would end up in if the board was rotated 90 degrees clockwise. Here is a visual example |
| update display for | board - a 2048 game board at some point in the game | none, this is a command block | This block updates the stage to display the input board, and sets (game board). This will help you mainly in testing, but should not be used in your game code |
We encourage you to play around with these blocks (input different values and see what the output is) to better understand what they do and how they work — you can also go into each block and look at the code. This will help you when using these blocks in the rest of the project. Just be sure not to change what is inside each of them.
Suggestions
Parts 3 and 4 will take a significant amount of your time spent on the project. We recommend managing your time to accommodate for the influx of difficulty on the latter half of project 3. A good mental checkpoint is to have part 2 done by Friday. These are merely suggestions based on the experience of students from previous semesters.
Part 1: Populating the Board
In this section of the project, you should fill out the ‘add 2 or 4 to _’ block. The value 2 should have a 75% chance of being added, and the value 4 should have a 25% chance. These values should be added to a randomly-selected empty space on the board.
Input: board - a 2048 game board with at least one empty space
Output: a copy of board with an added value at a random location
Make sure you aren’t modifying the original board when working on this. Your output should be a new copy of the board, and should not update the existing board. Updating the existing board is done for you in the provided game code.
Hint: Stuck? Check out some of the existing blocks in Snap! How will you find where to insert the value in the board? Are there any blocks we provide that could help?
Part 2: Rotating the Board
In this part, you should fill out the ‘rotate _ clockwise’ block, which takes in a board and returns a copy of the board that is the result of rotating the input board 90 degrees clockwise. (You will lose points if you rotate anti-clockwise.)
Input: board - a 2048 game board with at least one empty space
Output: a copy of board that has been rotated 90 degrees clockwise
Make sure you aren’t modifying the original board when working on this. Your output should be a new copy of the board, and should not update the existing board. Updating the existing board is done for you in the provided game code.
Hint: Take a look at the ‘rotated row’, ‘rotated column’, ‘size of board’, and ‘copy of’ blocks if you’re not sure how to do something! In particular, the ‘copy of’ block will let you duplicate the contents of a board and then update it separately from the original.
Part 3: Merging
In this section of the project, you’ll be filling out two blocks: ‘merge column _ of _ up’ and ‘merge up _’. It is highly recommended that you make helper blocks as part of your implementation of ‘merge column _ of _ up’. Note that you can create helper blocks by right clicking in the scripting area and selecting “make a block…”
This article breaks down the components of merging a single column, which you should mimic with your implementation. Also, make sure that you’re maintaining the abstraction provided by ‘merge column __ of __ up’ when you build ‘merge up __’ which is to say try to use ‘merge column __ of __ up’ while coding up ‘merge up __’.
‘merge column __ of __ up’ Input: col (number, 1 is the leftmost column), board - a 2048 game board Output: a copy of the board in which column col has been completely merged up
‘merge up’ Input: board - a 2048 game board at some point in the game Output: a copy of board in which all columns have been merged up
Make sure you aren’t modifying the original board when working on this. Your output should be a new version of the board, and should not update the existing board. Updating the existing board is done for you in the provided game code. Note that we only need one block that merges upward (rather than four blocks that each merge left, right, up, down) because we have the ‘rotate clockwise’ block. If we want to merge left, for example, we can first rotate the board clockwise 90 degrees, merge up, and then rotate the board clockwise 270 degrees. The provided skeleton code implements this for you, though!
Hint: Stuck? Check out some of the existing blocks in Snap! How will you find where to insert the value in the board? Are there any blocks we provide that could help?
Part 4: Ending the Game
In this part of the project, you’ll be filling in the ‘no moves left for _?’ block, which should report False when there are still merges available on the board, and True when the board cannot be merged further. Keep in mind that the board can be full and there can still be moves available.
Input: board - a 2048 game board
Output: whether or not the board can be merged further (Boolean)
Make sure you aren’t modifying the original board when working on this. Your output should be a Boolean, ie, True/False value signifying whether the game is over or not. Hint: We found the “cascade” block helpful…
Part 5: Testing
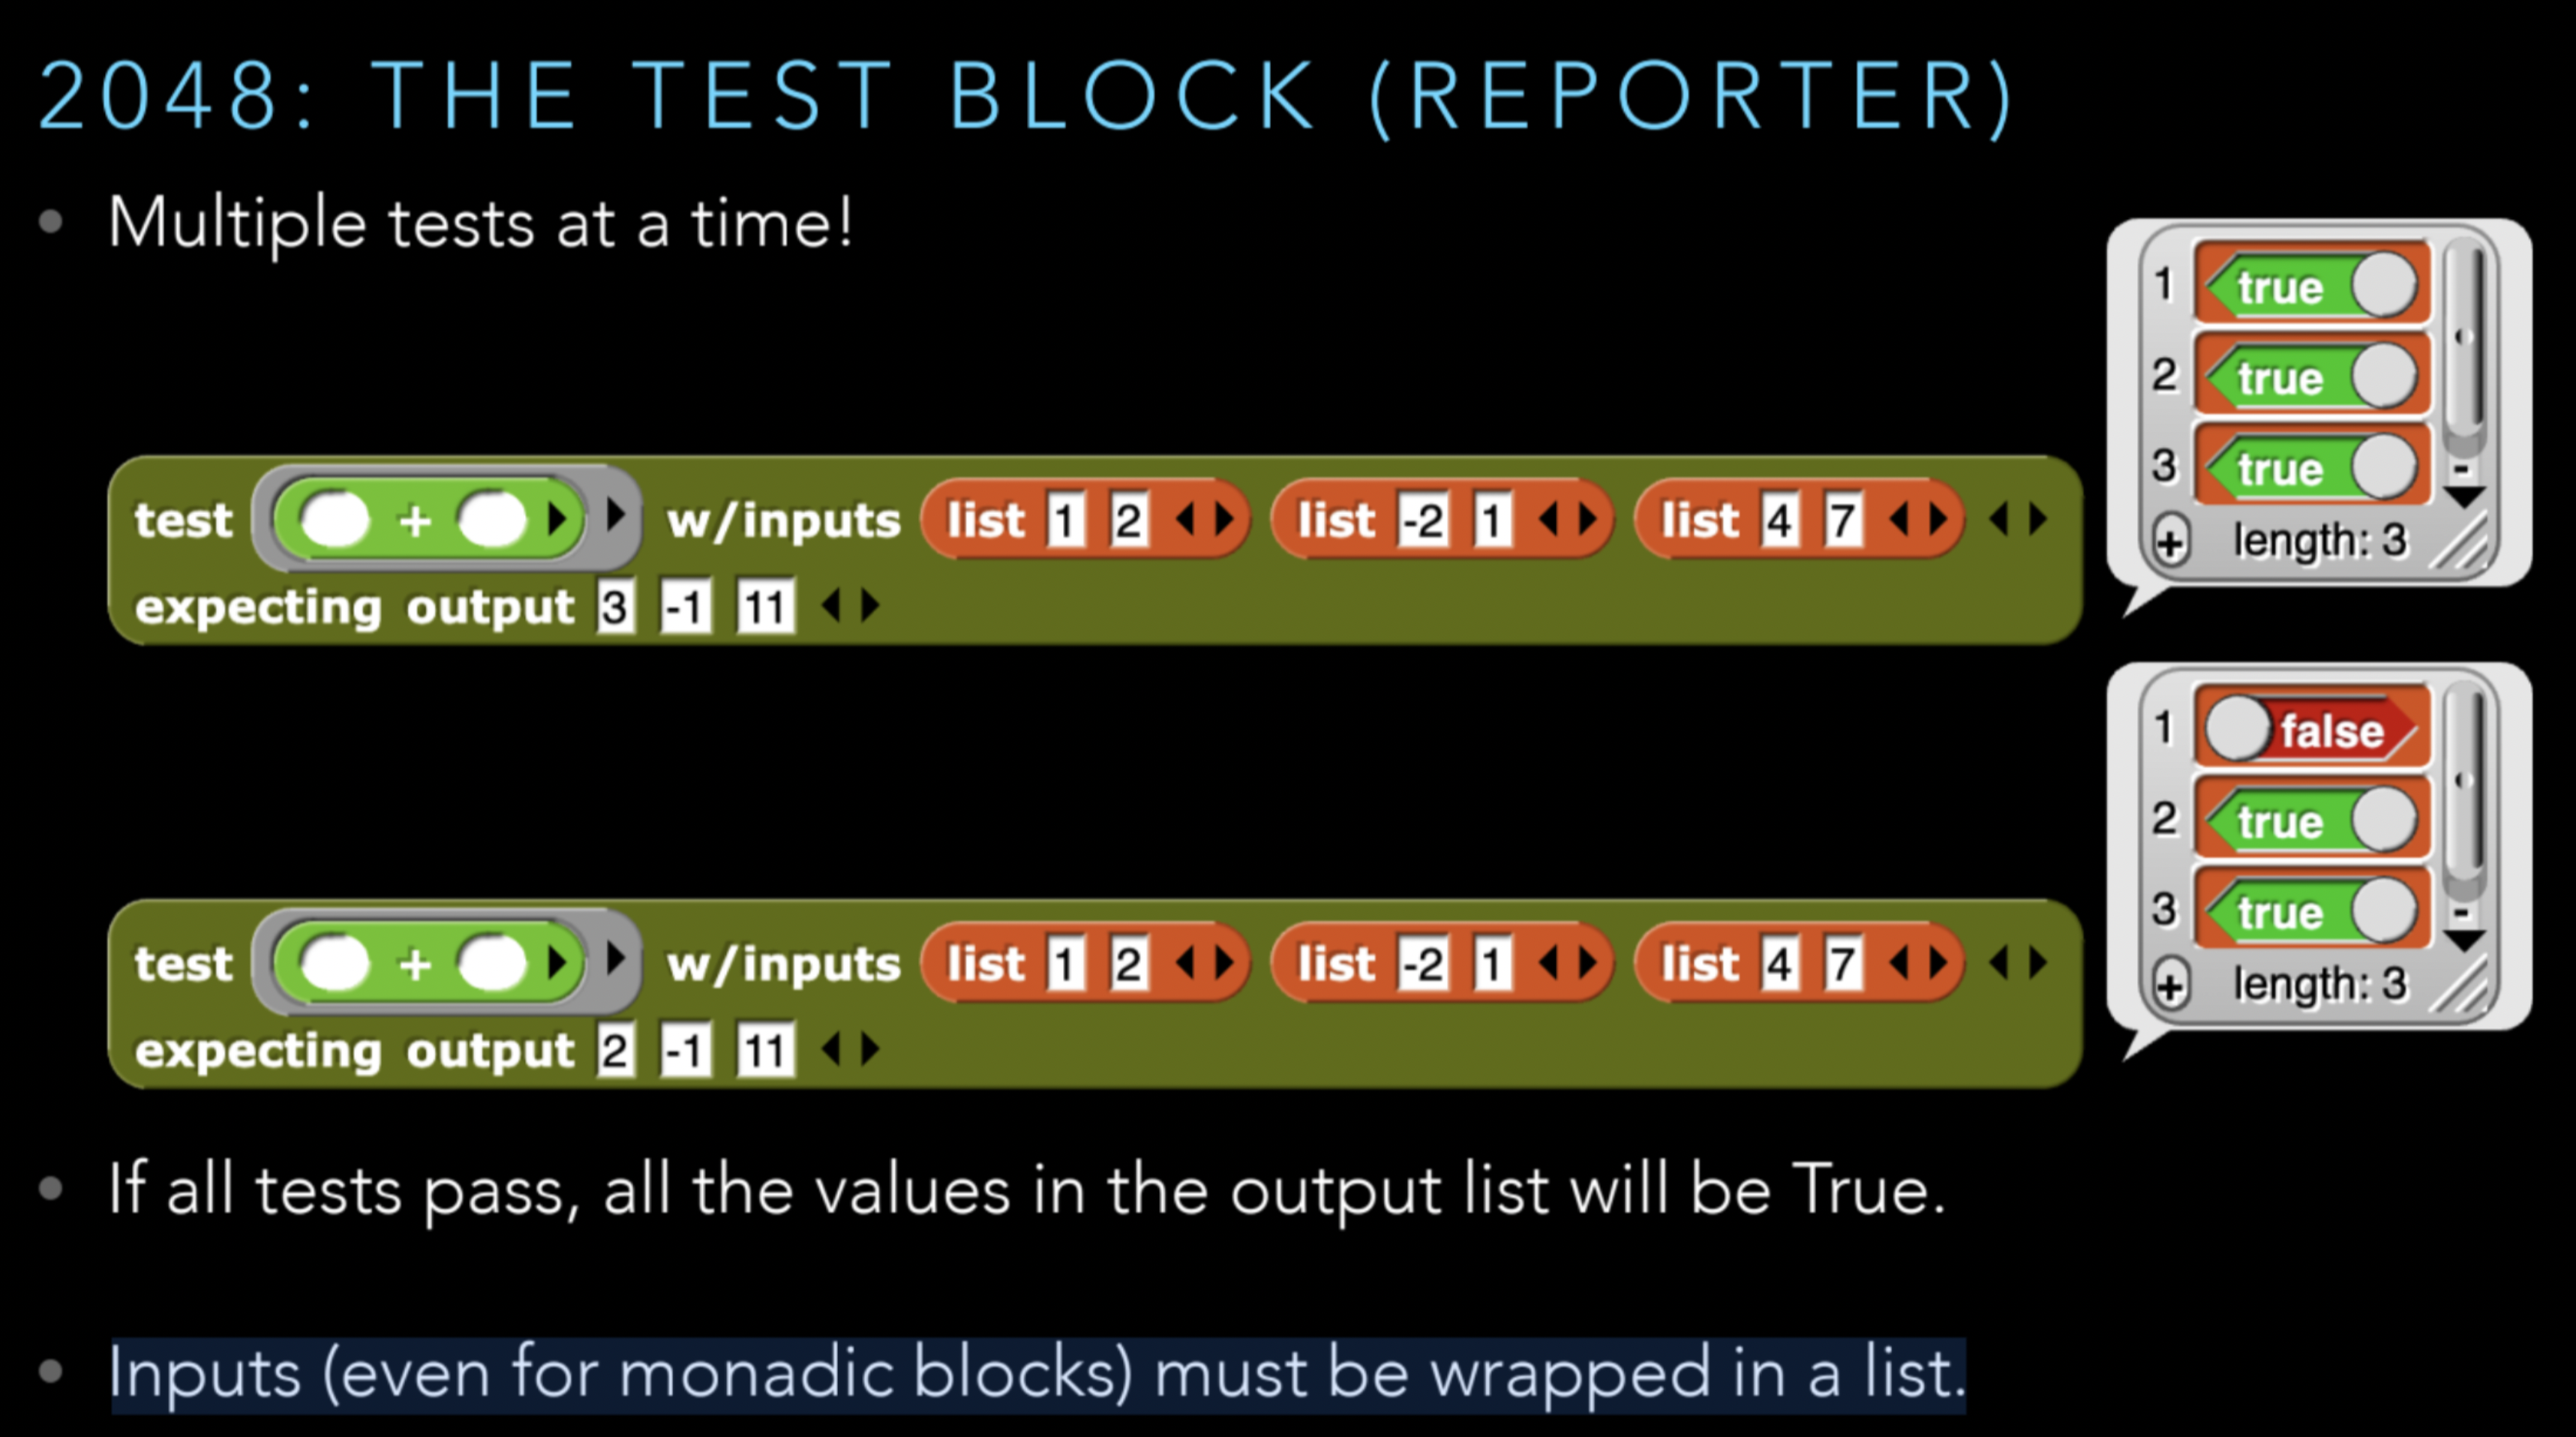
An important part of learning to program is being able to test your code effectively. We’ve taken the training wheels off; in earlier projects we gave you all the tests, here we ask you to create the tests yourself. In the TESTER sprite, you will see four blocks:

You need to create at least two separate test cases for these four blocks, with their respective expected output. Please note, that the reporter test function requires the board to be wrapped in an additional list block. Once you are done with all your tests, to get credit from the autograder, you have to drag these four blocks into the four holes of the append block and then click that block to assign GRADED TESTS, which the Autograder will use to give you credit.

Please note that your test cases should output True, not False. This is because the goal of testing is to check that your blocks work in normal cases as well as edge cases, not to check that it fails when expected. If your block outputs False, we assume this means your block does not pass the case and is therefore faulty. When writing test cases, each test should include input and output (follow the format in the Testing lab), and you should think about a genuine input for the block that would help you test if it accomplishes the task it should do, or catches some edgecase. For example, does the merge column up block work on a column with the values [0, 0, 2, 2]? If the merge column with this input correctly outputs [4, 0, 0, 0] in that column, the test block should output True. Check out these workbook pages which go deeper into the Test block and testing. Feel free to test your concepts in the 2048 lab section. Tests only present in your lab sprite will not be counted for project credit. The tests must be present in the “TESTER” section.
Here is guide and some examples of the testing block:
Feedback Form
Congratulations on finishing your third project in CS10🥳Please spend some time completing this feedback form. This will be worth 1 point of your project grade. Each member of your group should submit to the form. Thank you!
Grading
You have five blocks to write, and they will be scored according to the table below; a perfect score would earn 35 points. Note that for a particular block, the test cases may have different weights. The autograder needs a score between 0 and 1, so we divide the total score by 35 to send to the autograder. You should continue to work on your code until all test cases pass
Remember that your final score on this project is the score you’ll see on Gradescope, which will be out of 35 points. If at any point you’d like to see a more detailed about how we calculate that out-of-35 score, you can run the block we provide, which reports a nicely-formatted table (with headers) showing every test case, the expected value, and the actual value. Note: correct, working code should handle those test cases, but not have the test cases hardcoded into your solution; they should be able to handle any inputs according to the specifications. See grading breakdown below:
| Block | Type of Block | Points per Block |
|---|---|---|
| add 2 or 4 to _ | Reporter | 4.67 |
| rotate _ clockwise | Reporter | 4.67 |
| merge up column _ of _ | Reporter | 11.67 |
| merge up _ | Reporter | 4.67 |
| no moves left for _ ? | Predicate | 4.67 |
| Testing | Variable | 3.65 |
| Feedback Form | N/A | 1 |