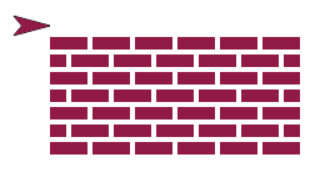
Sometimes, when we write programs and scripts, it feels like we have hit a brick wall. (This is a good sign; if a project isn't hard, you're not stretching your mind!) Now, you are going to draw this brick wall:

Abstraction
While Snap! has lots of blocks for drawing and
moving, it doesn't have anything about bricks. It
wouldn't make sense to have one in general because
most programs don't involve bricks. But ones that do
could really use a  block.
  moves us away from having to talk
in the computer's terms and closer to using the terms
of the problem we're trying to solve. The process of
moving from what the programming language gives you to
a natural language (one that humans speak to
communicate ) is critical to a
good abstraction.
In this problem, you will build an abstraction for drawing a brick wall, first by creating  , then blocks for drawing rows, and ultimately the goal:
  .
.
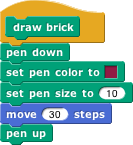
Drawing One Brick
A brick is a solid red rectangle ("brick red," i.e., not a bright primary-color red but somewhat darker). There's no "draw rectangle" block in Snap!, but we can fake it by thinking of a rectangle as a very thick line. You know how to draw a line, with the move block. In the Pen palette there's a set pen size block. We can use it to draw a thick line:

If you try out this block, you'll notice that your brick has rounded ends. These ends stick out beyond the length of the line you asked to draw. Here's a picture of the rounded brick with a regular line (pen size 1) inside it:

These rounded ends are very pretty when drawing most pictures, but
they don't look like bricks, and they make thinking about lengths in
this project too complicated. So for this project you're going to turn
off the rounded ends. Click on the settings button
( ) in the toolbar, and turn on the "Flat line
ends" setting.
Using Problem Decomposition to Write an Abstraction
Consider this line of code that was used to create the brick wall:

If you were to ask a mason to make a brick wall with seven rows, he would surely understand your meaning and make it happen. A computer, however, doesn't know what that means, so you have to fill in the details. This means going from the abstract (draw a brick wall) to the concrete (pardon the pun), which involves problem decomposition.
A quick observation shows that there are two kinds of rows of bricks:
-
Row A:

-
Row B:

Make blocks  and
and  . Think about what helper blocks besides
  you
might want.
It's possible to go overboard on abstraction, so that you have a gazillion
blocks and it's hard to find where the work actually gets done. But, on the
other hand, sometimes it's useful to make a custom block even if its
definition is just one primitive block. For example, to draw the
mortar (the white space) between blocks in a row, all you have to do
(since the  block picks up the pen at the end of its script) is move
forward:

You could just use that move block inside your Row A block. But you might instead want to define a Draw Mortar block. Why? Maybe later you'll decide that four steps is the wrong thickness for mortar, and you'd rather have five steps. If there are a dozen Move blocks scattered through your program to draw mortar, you might not find them all. With a Draw Mortar block, you can just change its definition, and all the mortar in your picture will be changed.
Notice that the two kinds of rows should be exactly the same length. Your first try at drawing a Row B will probably be a little too long. Why? Row A has six whole bricks. Row B has five whole bricks plus two half-bricks, which adds up to six whole bricks. To understand the bug, think about the amount of mortar in each kind of row.
How are you going to fix it? Should a Row B have different-size bricks, different-size mortar gaps, or different-size half-bricks? If you're not sure, try all the possibilities and see which looks right in the finished wall. (There's really only one good answer.)
Once you have the two kinds of rows the same length, you can write
the
 block. Remember that it should work for both even and odd numbers of
rows, which means that sometimes you'll have to draw an extra Row A.
(How do you know if a number is odd? You'll find the
 block helpful.)
Additional Exercises
After you've drawn the picture at the top of this page, add more inputs to the Draw a Brick Wall block:
- Length of the wall (how many bricks)
- Length of a brick
- Mortar thickness
Add these one at a time, not all at once! When you modify the length of a brick, that should also change the length of a half-brick. When you modify the mortar thickness, that should also change the distance between rows (since that's mortar too).